How to Seamlessly Match New Wood Flooring with Existing Floors
If you’re blending new wood floors with old ones, your goal is a smooth transition that looks great and works well. Here is a guide to the most effective steps and things to think about.
1. Identify the Appearance: Hardwood Species and Color First
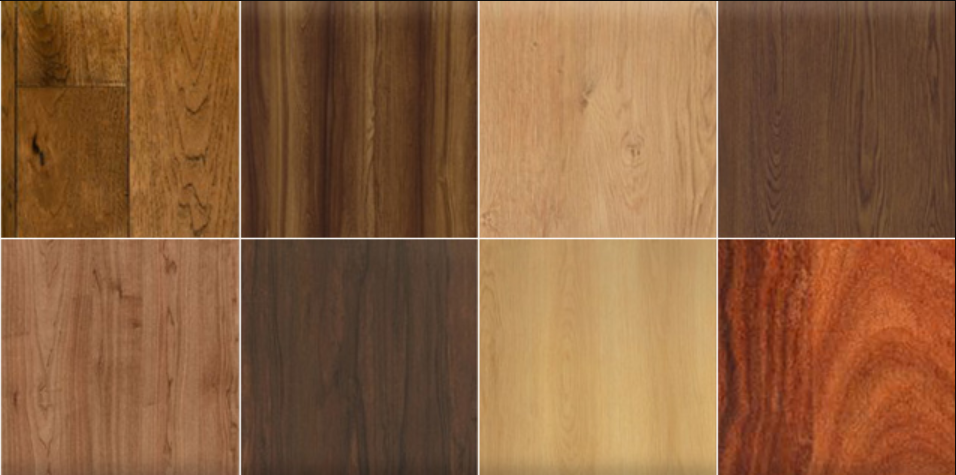
Before matching new flooring to your old floors, you must know the wood species you have. From my experience, getting this right helps everything blend smoothly.
| Aspect | Wood Species | Description / Characteristics |
|---|---|---|
| Grain & Texture | Oak | Strong, wavy grain; easy to see; very common. |
| Maple | Fine, smooth, even grain. Light and consistent appearance. | |
| Hickory | Straight grain, large rustic knots, natural and rugged look. | |
| Acacia | Faint, long grain patterns. Often shows reddish tones. | |
| Exotic Species (e.g., Brazilian cherry, teak, tigerwood) | Unique or bold grain, big visual differences between species. | |
| Color & Patina | Cherry | Darkens to rich, reddish-brown with age. |
| Walnut | Deep chocolate-brown color; smooth grain. | |
| Brazilian Cherry (Jatoba) | Reddish-brown with golden highlights; color varies between boards. | |
| Tigerwood | Pale gold or medium brown with bold, dark streaks. | |
| Brazilian Teak | Tan to medium brown, sometimes with red touches and even tone. | |
| Maple | Light, bright, and creamy color. | |
| Quick Guide (Summary) | Oak | Strong grain; available in red and white; traditional US/EU choice. |
| Maple | Even, fine grain; light color; resists dents well. | |
| Hickory | Clear knots and straight lines. | |
| Acacia | Reddish color with slight variations. | |
| Cherry | Deepens to reddish-brown over time. | |
| Walnut | Rich brown color; very smooth texture. |
Then, Inspect and Test the Color
Using a color fan or a digital color tool to analyze your floor’s color.
Always test your stain in a place no one will see, like inside a closet. Adjust the stain mix until your test spot blends with the main floor.
Account for Aging and Light
Sunlight should have changed the floor’s color over a decade. You will need to adjust the stain on new boards to match older, sun-exposed surfaces.
Matching the Finish for Consistency
Choose the Correct Sheen
You should match matte, semi-gloss, or high-gloss finishes to keep the look consistent. If your floor has a semi-gloss sheen, the new area needs the same finish. If not, the light will reflect differently and show the transition.
Professional engineers will be helpful. A pro can blend stains and mix custom colors for a perfect result. This helps get rid of the line where new and old floors meet.
Tips
Compare your floorboards to good photos in online flooring galleries.
If you are not sure, consult a flooring professional. An expert can confirm the species before you buy new wood.
Small differences in grain or color are obvious after you install the floor. It is important to be accurate, so getting the species right is the best way to make sure your new and old floors blend well together.
2. Check Wood Grade: Matching the Character of Old and New Hardwood Floors
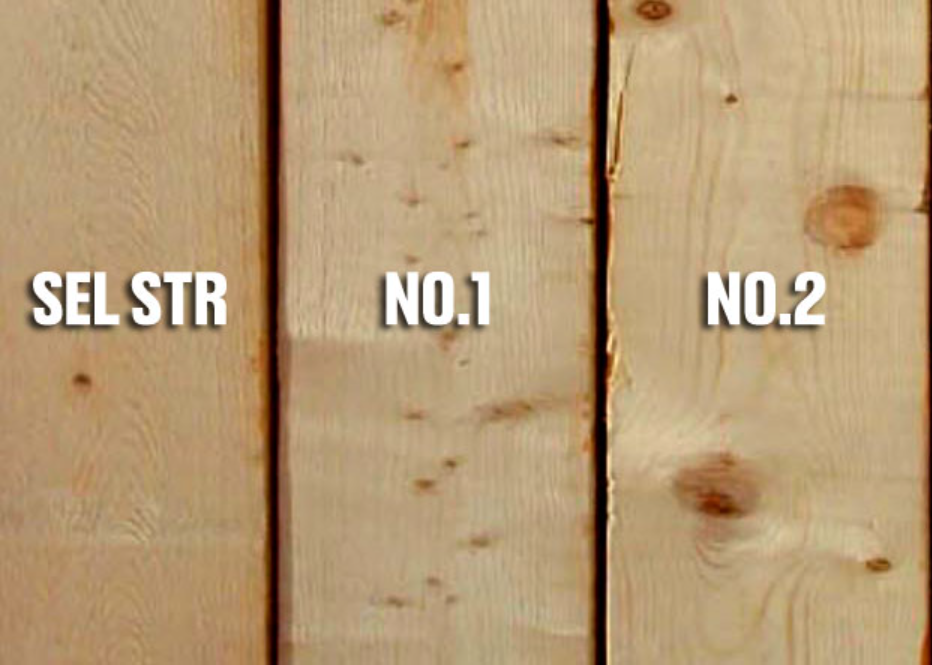
Matching the wood grade is just as vital as matching the wood type. This helps you blend new floors with your old ones. Wood grade tells you how much natural character you’ll see. This includes things like knots, mineral streaks, and color differences in the wood. The grade is about appearance; it does not reflect how durable the wood is.
Understanding Wood Flooring Grades
Select Grade: almost no color changes, knots, or marks.
#1 Common Grade: more natural differences, small knots and color changes.
#2 Common Grade: full of character, large knots, big color changes, and natural streaks.
Some laminate Flooring suppliers offer their special grading, then you should contact the flooring wholesalers where you bought the flooring.
How to Assess and Compare Wood Grades
To match your existing wood floor, check for knots, color streaks, and how clean or varied the boards look overall. Bringing a spare plank or clear, well-lit photos to the store helps, but if you’re working with a factory or supplier, mailing them a physical sample usually gets you the most accurate match.
Example: Let’s say your original floor is a Select grade white oak. You then add new planks of #2 Common grade. The new area will have more knots and color changes. In my view, this makes the transition look uneven and patchy, not smooth.
Key Points to Consider
Matching wood grade, cut, and finish is key to getting a clean, seamless look—especially in open spaces—and the best way to nail it is by checking physical samples or sending a piece of your existing floor to the factory for a precise match.
3. How to Match Plank Sizes for a Smooth Floor Connection
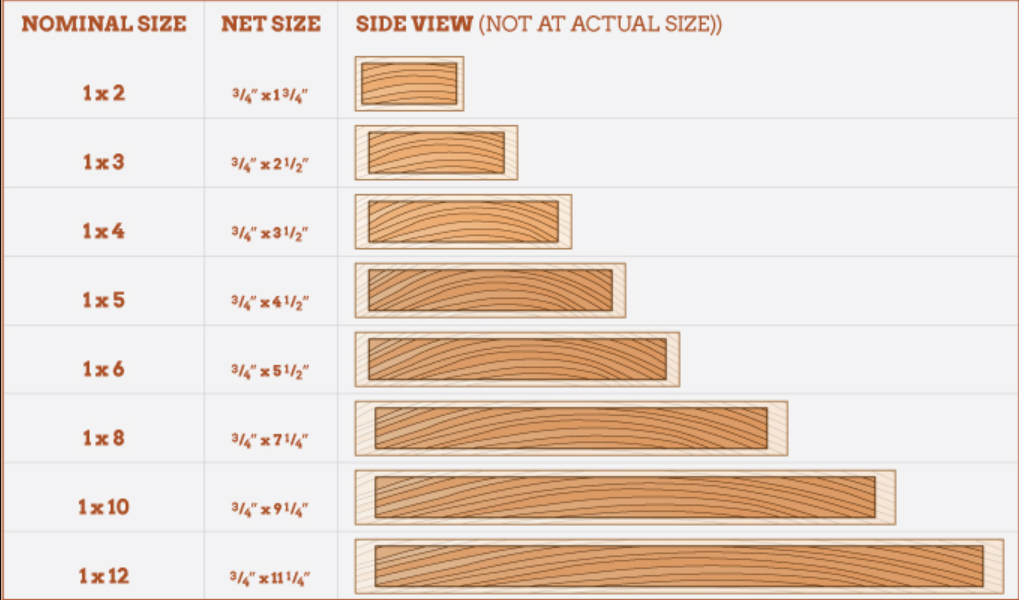
Measuring size is the most important step for a smooth connection between old and new wood floors. I recommend you check three things on every board: width, length, and thickness.
How to Measure and What I Look For
Plank Width: Grab a ruler or tape measure to find the width of your current planks. Most standard strip flooring is 2–3 inches wide. I find this gives a classic look and can make a room appear larger. Wider planks, 5 inches or more, give off a modern vibe. You need to match the width. For example, if your old planks are 5 inches, your new ones must also be 5 inches. This creates a clean, unbroken look.
Thickness: Most hardwood planks are 3/4 inch thick. In my work, I’ve seen older homes with custom boards, like some Douglas fir floors. Any difference in thickness will create an uneven floor. You’ll feel a step between the old and new sections. I always suggest you double-check the thickness. This is very important in older homes.
Plank Length: I suggest you also try to match the length of your new planks to the old ones. When the lengths match, the floor looks uniform and you avoid ugly seams. If you have very long or odd-sized boards, you might need to order custom planks. It’s an extra step, but I think it’s worth it for the result.
Tips for Tricky Plank Layouts
If your floor has planks of different widths, I recommend using a similar mix in the new section. For instance, you could use a pattern of two wide planks for every one narrow plank. I like to place them without a strict pattern to create a more natural style.
Make sure the space between each board is the same. Do this even if the widths are different. This will help you avoid gaps and keep the lines straight.
Practical Guide to Matching Plank Sizes
Write down the width, length, and thickness of the existing floors first.
Look for any unusual sizes. Older homes often need custom-made planks.
A small difference, like 1/4 inch in width or a slight change in thickness, will be very noticeable after installation.
I believe that correct measurements (width, thickness, and length) are the key to a professional-looking, smooth connection for your hardwood floor.
4. Matching Texture and Wear for New Wood Floors
From my experience, matching texture and wear is as important as matching color or plank size. These details help you avoid a floor that looks patched together. Instead, your floor will look like one seamless surface.
How I See Texture and Wear Affecting a Floor Match
Texture: I suggest you look at your current floors first. Are they smooth, wire-brushed, or hand-scraped? Do they have saw marks? You can often buy new prefinished floors with these textures. If you can’t find a direct match, a professional can finish the new boards on-site. This allows them to copy the unique surface of your old floor.
Wear Patterns: Your old floors probably have scratches and dents from years of use. This is normal. To make the new and old floors blend, a pro can copy these little flaws on the new boards. I’ve seen them use techniques like hand-scraping or adding small dents. They often do this in busy spots like hallways and kitchens.
Sheen and Patina: Old wood often gets a softer shine, or patina, as it ages. I recommend matching the gloss level between your floors. Check if your old floor is matte, satin, semi-gloss, or high-gloss. A flooring expert might need to add a tint or create a custom mix. This helps balance the shine and color depth.
Water-Popping for Color Depth: Does your old floor have a deep, rich color? You could ask about a technique called water-popping for the new boards. A pro applies water before staining. This opens up the wood grain so it absorbs more stain. The result is a new floor that appears to have aged just like the old one.
When you match the texture and wear of your wood floors, the transition looks great. In my opinion, it becomes almost invisible. Your guests won’t even notice the new section.
5. Other Helpful Strategies for Matching New and Existing Wood Floors
Matching new wood floors to old ones requires a few specific techniques. If you pay attention to the details I outline below, you will get a much better result.
Enhance the Color Blend With Water Popping: Water popping. It opens the wood’s grain, which allows the stain to soak in deeper. I find this step is great when new boards are lighter than older, darkened wood. You should only water the new boards, not the existing floor. This helps you get the color depth right where it is needed, making the transition almost invisible. But you should test it with samples first.
Feather and Stagger for Natural Transitions: Feathering new planks into the old floor. And creating staggered seams is important. Do not line up the end joints of the boards; instead, you should offset them.
Match the Sheen Level: You must match the sheen level (like matte, satin, or gloss) on both the new and old floors.
Test and Customize for Best Results
I recommend trying more than one stain. Test a few different ones on both the new and old planks. Wood absorbs stain differently depending on its age and wear, so you need to see how they compare.
Be ready to custom-mix stains. In my experience, getting a perfect match often means I have to tweak standard stain colors. I keep adjusting until the test spots blend together well.
Align Wood Species, Plank Size, and Pattern
I suggest using the same wood species and plank width as your original floor. If you use something different, even by a small amount, the new section will stand out.
You should also stick to the original installation pattern. If the old floor has herringbone, diagonal, or straight planks, use that same pattern. This keeps the look of the floor consistent.
Practical Use of Transition Strips
Sometimes, getting a perfect match is not possible. In that case, I recommend using transition strips like T-molding or thresholds. They create a clean border and work well in doorways or between different rooms. This helps connect the two spaces.
Data and Real-World Example
I remember a project where a client needed to match a new section of oak flooring to an existing one. Staining alone did not work. We had to water pop the new boards, feather the planks, match the sheen, and create a custom stain mix. After all that, the new area finally blended in with the old floor.
Summary: A To-Do List for Match New Wood Flooring with Existing Floors
1. Check Species & Color
Look at the wood grain and tone; check unfinished edges under vents or trim.
2. Confirm Wood Grade
Match Select, #1 Common, or #2 Common depending on the existing floor’s look.
3. Compare Grain Pattern
Identify if it’s plain sawn, quarter sawn, or rift sawn for visual consistency.
4. Match Surface Texture
Note if it’s smooth, hand-scraped, or wire-brushed—keep it consistent.
5. Measure Plank Width
Use exact measurements; old floors may need custom sizing.
6. Check Plank Length & Thickness
Match both to avoid height differences and uneven transitions.
7. Use Transition Strips (if needed)
Install T-molding or reducers if perfect matching isn’t possible.
8. Test Multiple Samples
Compare at least 3 options in different lighting (morning to evening).
9. Consider Refinishing
Refinish both sections together for a seamless, unified look.


